

How To Have A Good RV Shower While Dispersed Camping
If you’ve ever taken an RV Shower while Dispersed Camping, or Boondocking, you know they suck!
We hated ours since the first Harvest Hosts we ever stayed at.

Since then we have done some minor upgrades that you can do as well, and enjoy your RV Shower again!
What Your RV Has
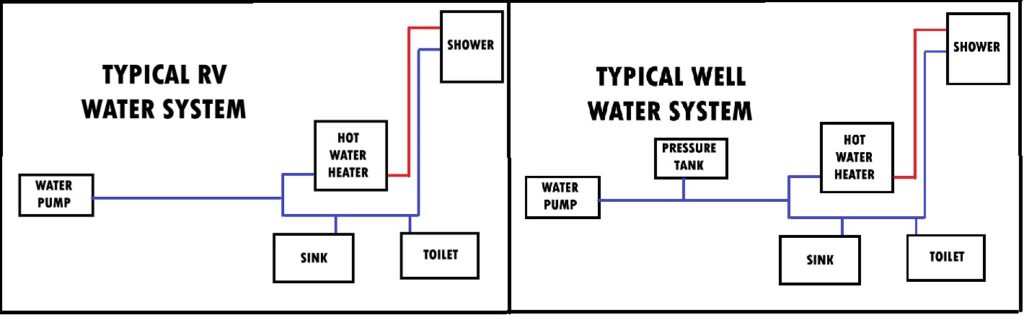
Your RV Water System is almost identical to the way a standard Home Well System works.

In a Home Well System the water supply is at the bottom of the well. Next comes your well water pump which takes the water supply and sends it through the pipes.
22 Must Have’s For Full Time RV Living

What’s Different
In a Home Well System, attached to the pipes between the well pump and any water outlets is a pressure tank. The purpose of the pressure tank is to build up a reserve of water, with a good pressure, so you don’t have the pump constantly running like we do in the RV system.
The pressure tank is basically a balloon on the top, and water chamber on the bottom. When the pump sends the water to the tank, it fills the bottom chamber, and compresses the balloon at the top.
If you open a faucet that balloon pushes the water back out, and down your pipes. Because of the volume of water in the tank, even as the pressure starts to drop, the balloon keeps the water coming at a steady rate. Your Well Pump kicks back on until it is back up to its normal high pressure.
An additional benefit to having the reserve pressure tank is that since your pump is not constantly running, it saves battery power. By cycling on and off it saves you those precious amp hours as well as extends the life of the pump.
Add A Pressure Tank
Now, I can’t take credit for being the first one to do this, even after being best friends with 3rd Generation Well Drillers since our T-Ball days. I came across this idea in a Montana Owners Forum, and when I mentioned it to my friends, they said “Wow, I can’t believe none of us ever thought to do that, no reason it shouldn’t work”.
By simply adding in a small pressure tank after the water pump, you can have a nice consistent water pressure in your RV Shower, even when boondocking. I am not even close to a licensed plumber, and thankfully there are no blow torches or soldering required. With a quick conversation my buddies told me how to crimp the PEX, and we had it done in an afternoon.
Instead of copper pipes, new RV’s come with something called PEX Tubing. It can handle higher pressures, and is much easier to work with. If you already have the PEX tools, awesome, you are ahead of the game. PEX Tools are something I would recommend having on hand in the case of a burst pipe. So if you don’t have them, it won’t hurt to order them as well.
The pressure tanks come in different sizes, so depending on the space you have, you can find one to fit. We were able to fit a 2 gallon tank in the belly area of our Fifth Wheel, so that is what we went with. Mounting it was simple, as the tank has 4 pre-drilled flanges that you can use to screw it to a cabinet wall.
Complete Parts List
(All Amazon links to the parts and tools we used to install it in an afternoon)
- Pressure Tank
- Cutting And Crimping Tools
- Roll of Blue PEX Tubing
- 1/2 Inch PEX Tee’s And 1/2 Inch PEX Elbow’s
- 1/2 Inch PEX to 1/2 Inch Male
- PEX Clamps
- Teflon Tape
Installation
First shut off the water to your RV and your water pump, and open all of your low point drains. Then locate your water pump, and identify which hose goes where. You want to find the arrow on your pump that indicates which way the water flows.
The arrow will be pointing towards one of the hoses connected to the pump. Follow this hose to the Blue PEX tubing it connects to. Along this piece of PEX is where you will want to splice in a Tee to add your pressure tank.
(Read: RV Toilet Paper, Do You Really Need To Us It?)
Find a place to mount your new pressure tank, and secure it in place first. You are going to work your way from the tank to the Blue PEX line you just found.
Wrap the 1/2 Inch Male threads with Teflon tape and tighten it into the tank. Next slide a 1/2 Inch clamp over the end of the new roll of PEX Tubing. Then slide the PEX tubing over the nipple on the 1/2 Inch Male you threaded into the tank and crimp it on.
Run your New PEX tubing to where you are going to splice it in to the existing line and cut it to length. Cut the existing line where you need to inset the Tee. Slide a PEX Clamp over each end of the cut PEX tubes. Insert the Tee into your PEX tubes, and crimp each one.
Home Stretch
That’s all there is too it. Now all you need to do is close all of your low point drains and refill your fresh water tank. Once your fresh water is full turn on your water pump and wait for your water lines to all fill. Open each faucet to bleed the air out of the system, then check all of your connections for leaks. If all the fittings are leak free, you can go ahead and close up the compartment.
If you are thinking about upgrading your water pump, now is a perfect time to do it. We installed a “quiet” water pump that puts out a higher pressure than the standard one. I don’t know that it’s quieter but, most times we have better pressure while boondocking than we do at a campground!
RV Shower
For an even better shower, consider upgrading your RV Shower Head! We swapped out our shower head for a low volume / high pressure shower head and absolutely love it. The new shower head uses less water in the shower but still puts out all over coverage.
(Read: What’s The Best RV Cooking Equipment?)
Our RV has a 12 gallon hot water heater. When we first got our RV, neither of us could take a shower without it going cold before we finished. Now after swapping out the RV Shower Head we can both shower in the morning without the hot water running out before we’re finished!
We would love if you would share our articles to facebook!